I have found it difficult to import an image then turn it into a Tile Map where an offset (A Space) was used between each tiled image. I would have to manually move the tiles individually at a time to align up each image up to make up for the offset in the image.
What I would suggest an option to add an offset during the process of “Turn Project Into Tile Set”.
It also might be good to have this were the image can be saved with an offset or with the option of removing it before saving the image.
(From what I have seen, the offset never is applied to the 1st row y axis or the 1st Columns x Axis.)
Hope that makes sense.
Will
If the added space between frames is consistent then you could consider it as a right-padding, in which case the easiest solution might be to import the whole set as an animation first and just crop away the extra padding, then import the cropped image as a tile-set (at least, in theory this should work, if all tiles are same-sized).
But the idea of a cropping option during tile-set import is good, especially if these added spaces are commonly found in tile-sets created with other applications. Is the added space due to some specific application which uses them by default, or was it the result of some custom tile-set system?
Hi @a_quack,
can you provide a sample? Which system generates such tile set images with space pixels and why?
-Jan
Hello
@jan.cosmigo . Here is an example you asked for. I’m not sure what the original create used. His creation can be found here
https://opengameart.org/content/platformer-art-deluxe. I was looking at adding some color variance to the sprites and cleaning up some of the sprite sizes. However, I soon found I couldn’t do it quickly with Pro Motion NG because of the Pixel offset.
It’s a sprite sheet that even uses different sized images which can’t be used for tiles directly. Two approaches come to mind. But be aware… these tiles are no indexed color pixel art. They are rendered with 24 Bit color depth. So you will have some side effects, extra things to get around…
Load the image and remove the empty lines and columns.
Go on a vertical padding line (it’s actually two pixels per line/column) and hit Ctrl + Alt + x. This removes a vertical pixel line. Do it twice to remove the two pixel columns.
Go through all columns.Same for pixel rows. They can be removed with Ctr + Alt + y
Then save the image again and import it as tiles.
Another way…
Use File/New Project/Create from single Images
Select all the tile files from the tiles folder that are tile images (leave out hill_*, tiles_spritesheet) and create the project.
Now every frame is a tile.
But… every frame has its own color palette. Click here:
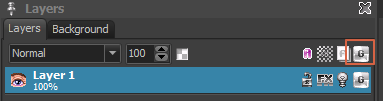
To create a global color palette.
Use these settings:
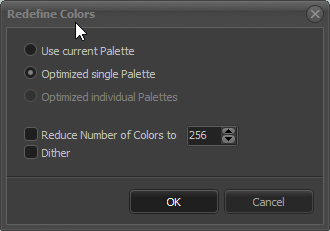
I suggest to sort the colors now by brightness. This will make the “white” to be at color index 0. It won’t be true white but you can change it to bee full white.
Now you can use Tile Mapping/Turn Project into Tile Maps. Enter 70x70 as tile size.
Now you have your tile set but the project now still uses each tile on a separate frame. Delete all frames except the first one.
Use Frame/Resize to resize your project to the desired tile map size.
You will find some tiles using wrong black pixels. This is because they are smaller than 70x70 and black was the default fill when loading the images. You can place such tiles on your map, switch to modify mode and remove the black pixels (e.g. fill with the fill tool and color index “0”).
Hope this helps a bit.
I recognize the artwork, it’s from a well known open source art pack that is used in many game engines examples, and has been redistributed in various formats (if I remember correctly, the source images are in vector format).
The problem with sprites sheets and atlases is that there are many new standards for packaging sprite resources in optimized ways, and some solutions are engine-specific.
So far, the best tool I’ve come across for packing and unpacking sprite sheets/atlases from/to the various formats supported by the different game engines is TexturePacker, a commercial tool by CodeAndWeb:
TexturePacker can also manage color depths conversions, and you can create your custom filters to handle unsupported formats. Being a dedicate tool, it focus on a single task and does it well. It’s very useful for game developers targeting multiple platforms (e.g. Desktop and Mobile) for it can reduce sizes and adapt tilemaps and sprites sheet to different engines (two ways) from a single set of source images.
@a_quack, if you work a lot with third party image assets you might consider getting TexturePacker to handle batch conversions — but the example sheet you provided wasn’t intended for Pixel-Art in the first place, so you’re going to be facing lossy image rsults after conversion.
Usually dedicated Pixel Art game engines don’t use/need texture packers, but if you’re working on modern 2D game engine (e.g. Unity in 2D graphics mode) then you’ll probably have to abide to some packaging standards.
Of course, sprites sheets and atlases packaging could also be done directly in PMNG, but a dedicated plugin would have be to created for each format (since packaging is not an ordinary operation, it might not be worth bloating PM by including it natively). It would be interesting to create a page dedicated to the sprites/tilemaps packaging formats that PM users actually use in their workflow, and gather more info about their specs, which game engines support them, etc. This could be the starting point for considering creating dedicated plugins — it wouldn’t make sense to create a plugin for each format unless we know that someone is actually using them, especially since many of these formats could belong to engines that don’t support Pixel Art well.
1 Like
@jan.cosmigo, thanks for the advice. I’ll give that a shot.
@tajmone, thanks for the Tips and insight.
I am a hobbyist working a simple game that has a mixture of both pixel art and more modern art styles. Not really an artist, but I know my way around C# Code and Unity. I was looking for something I could customize the sprites and Pro Motion NG seems to do a great job at doing when I was looking to do. I haven’t used many open sourced graphics so this is really only the second time I have ran into a Sprite Sheet that had Spaces between their Sprites. I don’t mind the Lossy of the colors on the example pack. It actually came out pretty good when I imported it. I just had it done to the nearest colors. In fact, it fit better with my flat colors I’ve been using anyways. Though, I do understand not everything imported would quite work out this well with the colors.
@tajmone Thanks for suggesting the TexturePacker. I’ll have to take a look at that soon.


